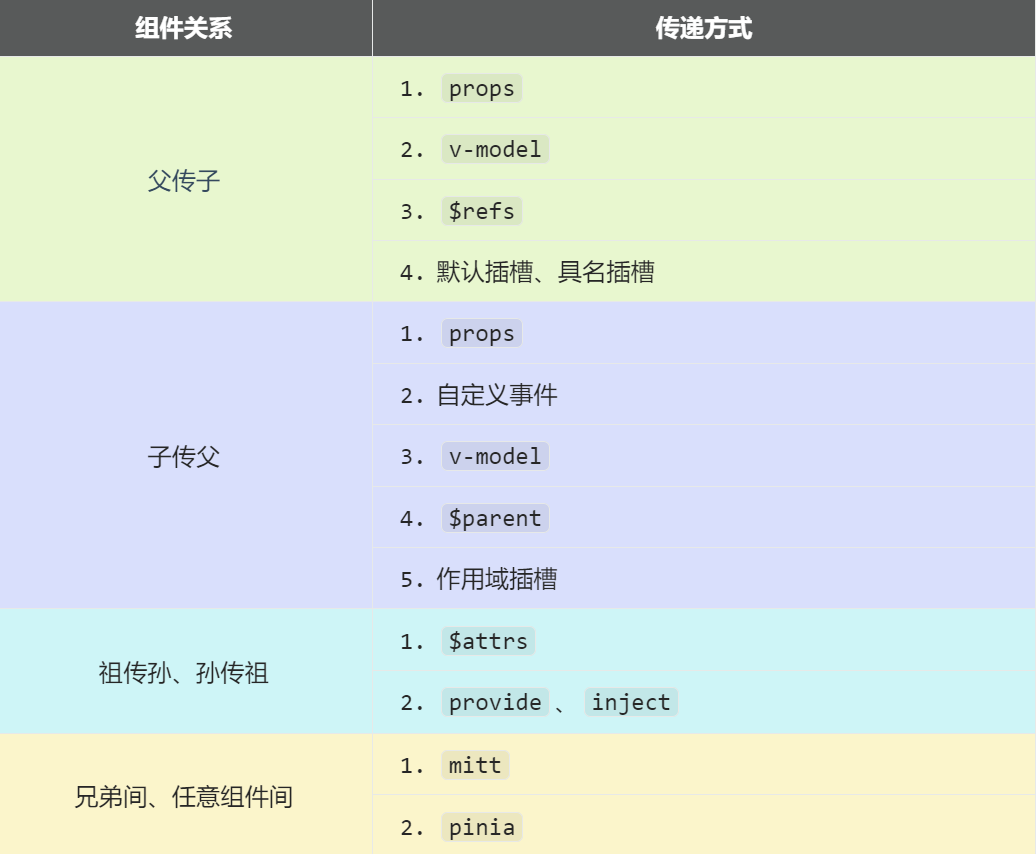
 组件通信
组件通信
# 组件通信
# Vue3组件通信和Vue2的区别
- 事件总线:Vue2 中常用的事件总线在 Vue3 中被移除,推荐使用
mitt代替。 - 状态管理:Vue2 中的
vuex被 Vue3 的pinia替代,提供了更好的类型支持和模块化。 - .sync 修饰符:Vue3 将
.sync修饰符优化到了v-model中,更加简洁直观。 $listeners合并到$attrs:Vue3 将$listeners的所有内容合并到了$attrs中,统一管理。- $children 移除:Vue3 移除了
$children,推荐使用ref和provide/inject进行组件间通信。
常见搭配形式:
# 1. 父子通信 (props)
概述
props 是 Vue 组件间最常见的通信方式,适用于 父 → 子 和 子 → 父 之间的数据传递。
- 父传子:父组件通过
props传递数据给子组件。 - 子传父:子组件通过调用
props传递的函数,将数据发送回父组件。
# 1.1 父传子
1.1.1 传递数据的基本方式
在 Vue 中,父组件可以通过 props 传递数据给子组件,而子组件通过 defineProps 来接收这些数据。
父组件 (Parent.vue)
在父组件中,我们定义一个 car 变量,并将其作为 props 传递给子组件。
<template>
  <div class="father">
    <h3>父组件</h3>
    <h4>我的车:{{ car }}</h4>
    <!-- 通过 props 传递 car 数据 -->
    <Child :car="car" />
  </div>
</template>

<script setup lang="ts">
import { ref } from 'vue';
import Child from './Child.vue';

// 定义 car 变量
const car = ref('奔驰');
</script>
2
3
4
5
6
7
8
9
10
11
12
13
14
15
16
子组件 (Child.vue)
在子组件中,我们使用 defineProps 接收 props 并展示它。
<template>
  <div class="child">
    <h3>子组件</h3>
    <h4>父给我的车:{{ car }}</h4>
  </div>
</template>

<script setup lang="ts">
import { defineProps } from 'vue';

// 定义 props 接收的类型
const props = defineProps<{ car: string }>();

// 直接从 props 获取 car 数据
const { car } = props;
</script>
2
3
4
5
6
7
8
9
10
11
12
13
14
15
16
1.1.2 props 传递多个数据
如果父组件想要传递多个数据,只需在 props 中添加更多的属性。
父组件 (Parent.vue)
<Child :car="car" :price="price" />
子组件 (Child.vue)
const props = defineProps<{ car: string; price: number }>();
1.1.3 props 传递数组、对象、布尔值
父组件
<Child :carList="['奔驰', '宝马', '奥迪']" :carInfo="{ brand: '奔驰', price: 500000 }" :isNew="true" />
子组件
const props = defineProps<{ carList: string[]; carInfo: { brand: string; price: number }; isNew: boolean }>();
# 1.2 子传父
1.2.1 基本实现方式
在 Vue 中,父组件可以通过 props 传递一个函数给子组件,子组件调用这个函数并传递数据给父组件,从而实现 子 → 父 传递。
父组件 (Parent.vue)
<template>
  <div class="father">
    <h3>父组件</h3>
    <h4>儿子给的玩具:{{ toy }}</h4>
    <!-- 传递 getToy 方法 -->
    <Child :getToy="getToy" />
  </div>
</template>

<script setup lang="ts">
import { ref } from 'vue';
import Child from './Child.vue';

// 变量存储子组件传递的数据
const toy = ref('');

// 父组件定义方法,接收子组件的数据
function getToy(value: string) {
  toy.value = value;
}
</script>
2
3
4
5
6
7
8
9
10
11
12
13
14
15
16
17
18
19
20
21
子组件 (Child.vue)
<template>
  <div class="child">
    <h3>子组件</h3>
    <h4>我的玩具:{{ toy }}</h4>
    <!-- 按钮点击时,将玩具传递给父组件 -->
    <button @click="giveToyToFather">玩具给父亲</button>
  </div>
</template>

<script setup lang="ts">
import { ref, defineProps } from 'vue';

// 子组件自己的数据
const toy = ref('奥特曼');

// 接收父组件传递的 getToy 方法
const props = defineProps<{ getToy: (value: string) => void }>();

// 方法:将玩具传给父组件
function giveToyToFather() {
  props.getToy(toy.value);
}
</script>
2
3
4
5
6
7
8
9
10
11
12
13
14
15
16
17
18
19
20
21
22
23
1.2.2 传递多个参数
如果子组件需要传递多个参数给父组件,可以修改 props 中的方法定义:
父组件
<Child :sendData="receiveData" />

<script setup lang="ts">
function receiveData(name: string, age: number) {
  console.log(`收到的数据:姓名 ${name},年龄 ${age}`);
}
</script>
2
3
4
5
6
7
子组件
const props = defineProps<{ sendData: (name: string, age: number) => void }>();

props.sendData('张三', 18);
2
3
# 1.3 props 规则和注意事项
props 不能在子组件内部修改
不能
props.car = '宝马',Vue 3 会报错:props are readonly。解决方案:
使用 ref 复制 props:
const myCar = ref(props.car);1使用 computed 进行转换:
const myCar = computed(() => props.car + ' (转换)');1
props 支持默认值
const props = defineProps<{ car?: string }>();
const car = computed(() => props.car ?? '默认车型');
1
2props 支持类型校验
const props = defineProps<{ car: string; price: number }>();1
总结
- 父传子:通过
props传递数据,子组件使用defineProps接收。 - 子传父:父组件通过
props传递一个函数,子组件调用该函数并传递数据回父组件。 - props 不能在子组件内部修改,需要通过
ref复制或者computed进行转换。
这是一种 单向数据流 的通信方式,数据始终从父组件流向子组件,子组件不能直接修改 props。
# 2. 自定义事件 (defineEmits)
在 Vue 组件通信中,defineEmits 主要用于 子组件向父组件传递数据。它允许子组件触发事件,并让父组件监听和处理这些事件。
在 Vue 2 中,子组件使用 this.$emit('事件名', 数据) 来触发事件,而在 Vue 3 中,使用 defineEmits 函数来定义可以触发的事件,并通过 emit 函数来触发事件。
# 2.1 defineEmits 语法
在 Vue 3 的 <script setup> 语法中,自定义事件的定义和触发变得更加直观:
import { defineEmits } from 'vue';

// 定义 emit 函数,声明子组件可以触发的事件
const emit = defineEmits(['事件名1', '事件名2']);

// 触发事件,并传递数据
emit('事件名1', 事件参数);
2
3
4
5
6
7
说明:
defineEmits:用于声明子组件可以触发的事件,参数是一个数组,包含事件名称。emit:用于触发定义的事件,并可以携带参数。
# 2.2 自定义事件的使用流程
自定义事件的使用分为 父组件监听事件 和 子组件触发事件 两个部分。
2.2.1 父组件监听子组件事件
在父组件中:
- 通过
@事件名="事件处理函数"监听子组件触发的自定义事件。 - 在事件处理函数中,接收并处理子组件传递的数据。
示例:父组件 (Parent.vue)
<template>
  <div class="father">
    <h3>父组件</h3>
    <h4>儿子给的玩具:{{ toy }}</h4>
    <!-- 监听子组件触发的自定义事件 send-toy -->
    <Child @send-toy="handleToy" />
  </div>
</template>

<script setup lang="ts">
import { ref } from 'vue';
import Child from './Child.vue';

// 响应式数据
const toy = ref('');

// 处理子组件传递的数据
function handleToy(value: string) {
  toy.value = value;
}
</script>
2
3
4
5
6
7
8
9
10
11
12
13
14
15
16
17
18
19
20
21
2.3.2 子组件触发自定义事件
在子组件中:
- 使用
defineEmits声明可以触发的事件。 - 通过
emit触发事件,并传递数据给父组件。
示例:子组件 (Child.vue)
<template>
  <div class="child">
    <h3>子组件</h3>
    <h4>我的玩具:{{ toy }}</h4>
    <!-- 按钮点击时触发 send-toy 事件,传递玩具数据 -->
    <button @click="sendToyToFather">玩具给父亲</button>
  </div>
</template>

<script setup lang="ts">
import { ref, defineEmits } from 'vue';

// 子组件数据
const toy = ref('奥特曼');

// 定义 emit 函数,声明子组件可以触发的事件 send-toy
const emit = defineEmits(['send-toy']);

// 方法:触发自定义事件,并传递数据给父组件
function sendToyToFather() {
  emit('send-toy', toy.value);
}
</script>
2
3
4
5
6
7
8
9
10
11
12
13
14
15
16
17
18
19
20
21
22
23
# 2.3 传递多个参数
如果子组件需要向父组件传递多个数据,可以在 emit 函数中添加多个参数:
2.4.1 父组件
<Child @send-user="handleUser" />

<script setup lang="ts">
function handleUser(name: string, age: number) {
  console.log(`收到的数据:姓名 ${name},年龄 ${age}`);
}
</script>
2
3
4
5
6
7
2.4.2 子组件
const emit = defineEmits(['send-user']);

emit('send-user', '张三', 18);
2
3
# 2.4 事件校验
在 Vue 3 中,defineEmits 可以接收对象格式来定义事件,同时对事件的参数进行类型校验:
const emit = defineEmits<{
  (event: 'send-toy', value: string): void;
  (event: 'send-user', name: string, age: number): void;
}>();
2
3
4
这样可以保证:
- 触发的事件名必须是
send-toy或send-user。 - 触发
send-toy时,必须传递一个string类型的值。 - 触发
send-user时,必须传递name: string和age: number。
# 3. 父子通信 (v-model)
v-model 是 Vue 中用于实现 父 ↔ 子 组件双向通信的工具。通过 v-model,父组件可以向子组件传递数据,子组件可以通过事件将更新的数据传回父组件,从而实现数据的双向绑定。
| 版本 | 绑定默认值 | 事件名 | 多个 v-model | 支持修改绑定属性 |
|---|---|---|---|---|
| Vue 2 | value | input | ❌(需 .sync) | ❌ |
| Vue 3 | modelValue | update:modelValue | ✅ | ✅ |
# 3.1 vue2中 v-model 的本质
在 Vue 2 中,v-model 的本质是 :value + @input 事件的封装,用于实现双向数据绑定。
🚀 v-model 单个属性绑定
Vue 2 默认 v-model 只能绑定 value,相当于:
<!-- Vue 2 使用 v-model -->
<input type="text" v-model="userName">

<!-- 实际上等价于 -->
<input
  type="text"
  :value="userName"
  @input="userName = $event.target.value"
/>
2
3
4
5
6
7
8
9
📌 说明
:value="userName":这行代码将父组件的userName绑定到input元素的value属性上,确保页面显示的是父组件中的数据。@input="userName = $event.target.value":这行代码确保当用户在input元素中输入时,触发input事件并将新的值通过$event.target.value传递回父组件,更新userName数据。
🔥 Vue 2 多 v-model 绑定
Vue 2 不能直接使用多个 v-model,需要用 .sync 或 props + $emit 进行模拟。
✅ 方式 1:使用 .sync(推荐)
.sync 本质上是 @update:xxx 的语法糖。
📌 父组件
<Child :title.sync="title" :content.sync="content" />
🔹 等价于
<Child :title="title" @update:title="title = $event"
       :content="content" @update:content="content = $event" />
2
📌 子组件
<template>
  <div>
    <input :value="title" @input="$emit('update:title', $event.target.value)" />
    <textarea :value="content" @input="$emit('update:content', $event.target.value)"></textarea>
  </div>
</template>

<script>
export default {
  props: ["title", "content"]
};
</script>
2
3
4
5
6
7
8
9
10
11
12
📌 说明
:title.sync="title"让title双向绑定。@input="$emit('update:title', $event.target.value)"让title变化后更新到父组件。
✅ 方式 2:手动 props + $emit
如果不使用 .sync,可以手动监听 @update:xxx。
📌 父组件
<Child :title="title" :content="content"
       @update:title="title = $event"
       @update:content="content = $event" />
2
3
📌 子组件
<template>
  <div>
    <input :value="title" @input="$emit('update:title', $event.target.value)" />
    <textarea :value="content" @input="$emit('update:content', $event.target.value)"></textarea>
  </div>
</template>

<script>
export default {
  props: ["title", "content"]
};
</script>
2
3
4
5
6
7
8
9
10
11
12
📌 区别
.sync语法糖 更简洁。props + $emit更灵活,但代码更长。
# 3.2 vue3中 v-model 的本质
在vue3中,在子组件中标签上面使用 v-model 时,它本质上是通过 :modelValue 和 @update:modelValue 事件来传递和更新数据。
<!-- 父组件中使用 v-model 指令 -->
<AtguiguInput v-model="userName"/>

<!-- 实际上是以下代码的封装 -->
<AtguiguInput :modelValue="userName" @update:modelValue="userName = $event"/>
2
3
4
5
:modelValue="userName":这行代码将父组件的userName传递给子组件,子组件通过modelValue接收父组件的值。@update:modelValue="userName = $event":当子组件内部的数据发生变化时,它会触发update:modelValue事件并将新的值传回父组件,更新userName。
# 3.3 v-model 实现父子组件之间的双向通信
在 Vue 3 中,v-model 的本质是 :modelValue 和 update:modelValue 事件。Vue 3 还允许你自定义这些默认名称,从而实现多个 v-model。
1. 父组件
父组件使用 v-model 将数据传递给子组件,并监听子组件触发的事件来接收更新的数据。
<template>
  <div class="father">
    <h3>父组件</h3>
    <AtguiguInput v-model="userName"/>
    <p>用户名:{{ userName }}</p>
  </div>
</template>

<script setup lang="ts">
import { ref } from 'vue';
import AtguiguInput from './AtguiguInput.vue';

const userName = ref('');
</script>
2
3
4
5
6
7
8
9
10
11
12
13
14
在上面的例子中,父组件通过 v-model 将 userName 数据传递给子组件。
2. 子组件
子组件通过 defineProps 接收父组件传递的 modelValue,并通过 defineEmits 声明可以触发的 update:modelValue 事件,传递更新的数据回父组件。
<template>
  <div class="box">
    <input
      type="text"
      :value="modelValue"
      @input="emit('update:modelValue', $event.target.value)"
    >
  </div>
</template>

<script setup lang="ts">
import { defineProps, defineEmits } from 'vue';

// 接收父组件传递的数据
const props = defineProps(['modelValue']);

// 声明触发的事件
const emit = defineEmits(['update:modelValue']);
</script>
2
3
4
5
6
7
8
9
10
11
12
13
14
15
16
17
18
19
在子组件中:
defineProps(['modelValue']):用于接收父组件传递的modelValue属性。defineEmits(['update:modelValue']):用于声明子组件能够触发的事件,在这里是update:modelValue。
# 3.4 自定义 v-model 的属性名称和事件名称
Vue 3 允许你自定义 v-model 的属性名称和事件名称。通过 v-model:自定义属性 来更改 modelValue 属性名,和 update:自定义属性 来更改事件名称。
<!-- 使用自定义属性 abc -->
<AtguiguInput v-model:abc="userName"/>

<!-- 实际上是以下代码的封装 -->
<AtguiguInput :abc="userName" @update:abc="userName = $event"/>
2
3
4
5
1. 修改子组件
子组件需要更新属性和事件名称,以适应自定义的 v-model。
<template>
  <div class="box">
    <input
      type="text"
      :value="abc"
      @input="emit('update:abc', $event.target.value)"
    >
  </div>
</template>

<script setup lang="ts">
import { defineProps, defineEmits } from 'vue';

// 接收自定义的 abc 属性
const props = defineProps(['abc']);

// 声明触发的自定义事件 update:abc
const emit = defineEmits(['update:abc']);
</script>
2
3
4
5
6
7
8
9
10
11
12
13
14
15
16
17
18
19
2. 多个 v-model
由于 Vue 3 中支持自定义 v-model 的属性和事件名称,允许你在一个组件中使用多个 v-model,从而实现多个双向绑定。
<AtguiguInput v-model:abc="userName" v-model:xyz="password"/>
关于 `$event`
- 原生事件:在原生事件中,
$event是事件对象,包含与事件相关的信息(如target)。你可以使用.target获取事件触发的元素。 - 自定义事件:在自定义事件中,
$event传递的是事件触发时传递的数据(如更新后的值)。此时,$event已经是数据本身,不能再使用.target。
# 4. 任意组件间通信 (mitt)
在 Vue 组件间通信时,父子组件可以通过 props 和 defineEmits 进行通信,但当组件层级较深或是需要在任意两个组件之间进行通信时,使用 mitt 是一个更灵活的解决方案。
mitt 是一个轻量级的 事件总线(Event Bus) 库,它提供了事件的 订阅(on)、发布(emit)、取消订阅(off) 和 清空所有事件(all.clear) 的功能。
适用场景
- 兄弟组件通信(如
A.vue需要给B.vue发送消息) - 跨层级组件通信(避免过度使用
provide/inject) - 全局事件管理(如
消息通知、主题切换)
| 方法 | 作用 |
|---|---|
emitter.on('事件名', 回调) | 监听事件,回调函数接收数据 |
emitter.emit('事件名', 数据) | 触发事件,传递数据 |
emitter.off('事件名') | 取消监听事件 |
emitter.all.clear() | 清除所有事件 |
# 4.1 安装 mitt
在 Vue 3 项目中,你可以使用以下命令安装 mitt:
npm install mitt
安装完成后,即可在项目中使用 mitt 来实现 任意组件间的通信。
# 4.2 使用 mitt 进行组件通信
使用 mitt 通信通常需要 三步:
- 创建
emitter实例 并全局导出,使多个组件可以使用。 - 在接收数据的组件中 使用
emitter.on监听事件,接收数据。 - 在提供数据的组件中 使用
emitter.emit触发事件,发送数据。
第一步:创建 emitter 实例
创建一个全局的 emitter 实例,使得所有组件都可以使用它。
📌 新建文件 src/utils/emitter.ts
// 1. 引入 mitt
import mitt from "mitt";

// 2. 创建 mitt 实例
const emitter = mitt();

// 3. 导出 emitter 实例
export default emitter;
2
3
4
5
6
7
8
说明
- 这里使用
mitt创建了一个emitter事件总线实例。 - 其他组件可以直接引入
emitter来使用。
第二步:接收数据的组件
在需要 监听事件并接收数据 的组件中:
- 使用
emitter.on('事件名', 回调函数)监听事件。 - 在组件卸载时,使用
emitter.off('事件名')取消监听,防止内存泄漏。
📌 接收数据的组件(Receiver.vue)
<template>
  <div class="receiver">
    <h3>接收数据的组件</h3>
    <p>收到的玩具:{{ receivedToy }}</p>
  </div>
</template>

<script setup lang="ts">
import { ref, onUnmounted } from "vue";
import emitter from "@/utils/emitter"; // 引入 emitter 实例

// 定义变量用于存储接收到的数据
const receivedToy = ref('');

// 监听 `send-toy` 事件,获取数据
emitter.on('send-toy', (value) => {
  console.log('收到 send-toy 事件,数据:', value);
  receivedToy.value = value;
});

// 组件销毁时,取消监听事件,防止内存泄漏
onUnmounted(() => {
  emitter.off('send-toy');
});
</script>
2
3
4
5
6
7
8
9
10
11
12
13
14
15
16
17
18
19
20
21
22
23
24
25
说明
emitter.on('send-toy', 回调函数):监听send-toy事件,并在回调函数中获取数据。onUnmounted(() => { emitter.off('send-toy'); }):确保在组件销毁时移除监听,防止内存泄漏。
第三步:提供数据的组件
在需要 触发事件并发送数据 的组件中:
- 使用
emitter.emit('事件名', 数据)触发事件,并携带数据。
📌 提供数据的组件(Provider.vue)
<template>
  <div class="provider">
    <h3>提供数据的组件</h3>
    <button @click="sendToy">发送玩具</button>
  </div>
</template>

<script setup lang="ts">
import emitter from "@/utils/emitter"; // 引入 emitter 实例
import { ref } from "vue";

// 定义要发送的玩具数据
const toy = ref('奥特曼');

// 触发 `send-toy` 事件,并传递玩具数据
function sendToy() {
  console.log('触发 send-toy 事件,数据:', toy.value);
  emitter.emit('send-toy', toy.value);
}
</script>
2
3
4
5
6
7
8
9
10
11
12
13
14
15
16
17
18
19
20
说明
emitter.emit('send-toy', toy.value)触发send-toy事件,并携带toy.value作为参数。- 这样,任何监听
send-toy事件的组件都可以接收到toy.value的数据。
# 4.3 mitt 的其他 API
1. emitter.on('事件名', 回调函数)
作用:监听事件,在事件触发时执行回调函数。
emitter.on('abc', (value) => {
  console.log('abc 事件被触发', value);
});
2
3
2. emitter.emit('事件名', 数据)
作用:触发事件,并向监听者传递数据。
emitter.emit('abc', 666);
3. emitter.off('事件名')
作用:取消对某个事件的监听,防止内存泄漏。
emitter.off('abc');
4. emitter.all.clear()
作用:清除所有事件监听。
emitter.all.clear();
# 4.4 mitt 的完整使用
# 1. emitter.ts(创建事件总线)
import mitt from "mitt";
const emitter = mitt();
export default emitter;
2
3
# 2. Provider.vue(发送数据)
<template>
  <div>
    <h3>发送数据组件</h3>
    <button @click="sendToy">发送玩具</button>
  </div>
</template>

<script setup lang="ts">
import emitter from "@/utils/emitter";
import { ref } from "vue";

const toy = ref('奥特曼');

function sendToy() {
  emitter.emit('send-toy', toy.value);
}
</script>
2
3
4
5
6
7
8
9
10
11
12
13
14
15
16
17
# 3. Receiver.vue(接收数据)
<template>
  <div>
    <h3>接收数据组件</h3>
    <p>收到的玩具:{{ receivedToy }}</p>
  </div>
</template>

<script setup lang="ts">
import { ref, onUnmounted } from "vue";
import emitter from "@/utils/emitter";

const receivedToy = ref('');

emitter.on('send-toy', (value) => {
  receivedToy.value = value;
});

onUnmounted(() => {
  emitter.off('send-toy');
});
</script>
2
3
4
5
6
7
8
9
10
11
12
13
14
15
16
17
18
19
20
21
# 5. 祖孙组件通信 ($attrs)
在 Vue 组件间通信时,通常使用:
props进行父 → 子通信emit进行子 → 父通信
但当 祖组件(父组件)想要直接向孙组件传递数据,而子组件不需要使用这些数据 时,使用 props 可能会导致 子组件必须声明但不会用到 props,增加代码冗余。
Vue 3 提供的 $attrs 允许 祖组件(父组件)直接向孙组件传递数据,而不需要子组件声明 props,避免中间组件的干扰,使数据传递更加简洁。
# 5.1 $attrs 的作用
$attrs存储了所有父组件传递但未被子组件声明的props。- 子组件可以将
$attrs直接绑定到孙组件上,实现祖 → 孙通信。 $attrs只能在setup()或<script setup>语法中访问,不能在template中直接使用。- 默认情况下,子组件不会透传
props给孙组件,但可以手动使用v-bind="$attrs"让孙组件接收这些props。
# 5.2 使用 $attrs 实现祖 → 孙通信
完整的步骤:
- 父组件(祖组件) 向 子组件 传递多个
props。 - 子组件 不声明
props,而是使用$attrs透传所有props给 孙组件。 - 孙组件 直接接收透传过来的
props并使用。
# 5.4 代码实现
# 5.4.1 父组件(Father.vue)
父组件向子组件传递多个 props
<template>
  <div class="father">
    <h3>父组件</h3>
    <Child :a="a" :b="b" :c="c" :d="d" v-bind="{ x: 100, y: 200 }" :updateA="updateA" />
  </div>
</template>

<script setup lang="ts">
import { ref } from "vue";
import Child from "./Child.vue";

const a = ref(1);
const b = ref(2);
const c = ref(3);
const d = ref(4);

// 定义 updateA 方法,允许子组件修改 a
function updateA(value: number) {
  a.value = value;
}
</script>
2
3
4
5
6
7
8
9
10
11
12
13
14
15
16
17
18
19
20
21
✅ 说明
a,b,c,d传递的是普通数据。{ x: 100, y: 200 }通过v-bind传递额外的数据。updateA是一个方法,允许孙组件更新a。
# 5.4.2 子组件(Child.vue)
子组件不声明 props,直接透传 $attrs
<template>
  <div class="child">
    <h3>子组件</h3>
    <!-- 直接透传所有 $attrs 给孙组件 -->
    <GrandChild v-bind="$attrs" />
  </div>
</template>

<script setup lang="ts">
import GrandChild from "./GrandChild.vue";
</script>
2
3
4
5
6
7
8
9
10
11
✅ 说明
Child.vue不需要声明props,因为它本身不会使用a,b,c,d,x,y。- 直接通过
v-bind="$attrs"让孙组件接收attrs中的所有数据。
# 5.4.3 孙组件(GrandChild.vue)
孙组件直接接收透传的数据
<template>
  <div class="grand-child">
    <h3>孙组件</h3>
    <h4>a:{{ a }}</h4>
    <h4>b:{{ b }}</h4>
    <h4>c:{{ c }}</h4>
    <h4>d:{{ d }}</h4>
    <h4>x:{{ x }}</h4>
    <h4>y:{{ y }}</h4>
    <button @click="updateA(666)">点我更新 A</button>
  </div>
</template>

<script setup lang="ts">
defineProps(["a", "b", "c", "d", "x", "y", "updateA"]);
</script>
2
3
4
5
6
7
8
9
10
11
12
13
14
15
16
✅ 说明
- 孙组件直接声明
props,接收$attrs透传过来的数据。 - 通过
updateA(666)按钮调用updateA方法,修改a的值(数据会同步回Father.vue)。
# 5.5 $attrs 内部数据
在 Child.vue 组件中,$attrs 实际上是一个对象,包含了所有 未被 Child.vue 声明的 props。
console.log($attrs);
// 结果:
{
  a: 1,
  b: 2,
  c: 3,
  d: 4,
  x: 100,
  y: 200,
  updateA: function updateA(value) { ... }
}
2
3
4
5
6
7
8
9
10
11
🔹 解析
- 因为
Child.vue没有声明props,Vue 自动把这些props存入$attrs。 - 子组件
$attrs只是一个“中转站”,数据不会被消耗,而是透传给孙组件。
# 5.6 组件生命周期中的 $attrs
$attrs 是响应式的,如果父组件 props 变化,$attrs 也会自动更新。
import { useAttrs, watchEffect } from "vue";

const attrs = useAttrs();

watchEffect(() => {
  console.log(attrs);
});
2
3
4
5
6
7
# 5.7 $attrs 的应用场景
- 祖孙组件通信:减少
props声明,简化代码结构。 - 高阶组件(HOC):封装组件时,让外部组件可以透传
props。 - 动态组件通信:如
keep-alive组件传递props。
| 方式 | 适用场景 | 主要用途 |
|---|---|---|
props | 父 → 子 组件 | 直接声明 props 传递数据 |
emit | 子 → 父 组件 | emit 触发事件,父组件监听 |
$attrs | 祖 → 孙 组件 | 透传 props,中间组件无需声明 |
# 6. 父子通信 ($refs, $parent)
# 6.1 概述
在 Vue 组件通信中,通常推荐使用:
props(父 → 子)emit(子 → 父)$attrs(祖 → 孙)
但在某些特殊场景下,直接获取组件实例或者 DOM 元素会更方便,这时可以使用:
$refs(父 → 子):用于直接访问 子组件实例 或 DOM 元素。$parent(子 → 父):用于直接访问 父组件实例。
| 属性 | 作用 |
|---|---|
$refs | 值为对象,包含所有被 ref 绑定的 DOM 元素或子组件实例 |
$parent | 值为对象,当前组件的 父组件实例 |
# 6.2 $refs(父 → 子)
适用场景
- 父组件想要直接操作子组件的方法或数据(不使用
props)。 - 父组件想要访问子组件中的 DOM 元素(如
input,canvas)。 - 获取子组件暴露的属性(需
defineExpose)。
# 6.2.1 使用 $refs 访问子组件数据
父组件通过 ref 绑定子组件,然后使用 $refs 获取子组件的实例,访问其数据和方法。
① 父组件
<template>
  <div class="father">
    <h3>父组件</h3>
    <button @click="getChildData">获取子组件数据</button>
    <Child ref="childRef" />
  </div>
</template>

<script setup lang="ts">
import { ref } from "vue";
import Child from "./Child.vue";

// 绑定子组件实例
const childRef = ref();

// 访问子组件数据和方法
function getChildData() {
  console.log("子组件数据:", childRef.value.toy);
  childRef.value.sayHello();
}
</script>
2
3
4
5
6
7
8
9
10
11
12
13
14
15
16
17
18
19
20
21
② 子组件
<template>
  <div class="child">
    <h3>子组件</h3>
  </div>
</template>

<script setup lang="ts">
import { ref } from "vue";

const toy = ref("奥特曼");

// 子组件方法
function sayHello() {
  console.log("子组件方法被调用了");
}

// 让父组件能访问 `toy` 和 `sayHello`
defineExpose({ toy, sayHello });
</script>
2
3
4
5
6
7
8
9
10
11
12
13
14
15
16
17
18
19
✅ 说明
- 父组件
- 绑定
ref="childRef",获取子组件实例。 - 通过
childRef.value.toy访问子组件数据。 - 通过
childRef.value.sayHello()调用子组件方法。
- 绑定
- 子组件
- 使用
defineExpose({ toy, sayHello })暴露数据和方法,否则父组件无法访问。
- 使用
# 6.2.2 使用 $refs 访问子组件的 DOM
如果子组件是一个原生 DOM(如 input),可以直接操作它。
① 父组件
<template>
  <div class="father">
    <h3>父组件</h3>
    <input ref="inputRef" type="text" />
    <button @click="focusInput">聚焦输入框</button>
  </div>
</template>

<script setup lang="ts">
import { ref } from "vue";

// 绑定 DOM
const inputRef = ref();

// 聚焦输入框
function focusInput() {
  inputRef.value.focus();
}
</script>
2
3
4
5
6
7
8
9
10
11
12
13
14
15
16
17
18
19
✅ 说明
ref="inputRef"绑定到input标签。inputRef.value.focus()直接调用input的focus()方法。
# 6.3 $parent(子 → 父)
适用场景
- 子组件需要访问父组件的数据或方法(不通过
emit)。 - 子组件需要调用父组件的方法。
⚠️ 注意:使用 $parent 直接访问父组件的实例 可能破坏组件解耦,建议尽量使用 props 和 emit,仅在特殊情况使用。
# 6.3.1 使用 $parent 访问父组件数据
① 父组件
<template>
  <div class="father">
    <h3>父组件</h3>
    <p>父组件数据:{{ message }}</p>
    <Child />
  </div>
</template>

<script setup lang="ts">
import { ref } from "vue";
import Child from "./Child.vue";

const message = ref("父组件的消息");
</script>
2
3
4
5
6
7
8
9
10
11
12
13
14
② 子组件
<template>
  <div class="child">
    <h3>子组件</h3>
    <button @click="getParentData">获取父组件数据</button>
  </div>
</template>

<script setup lang="ts">
import { getCurrentInstance } from "vue";

// 获取父组件实例
const instance = getCurrentInstance();
const parent = instance?.proxy?.$parent;

// 访问父组件数据
function getParentData() {
  console.log("父组件数据:", parent?.message);
}
</script>
2
3
4
5
6
7
8
9
10
11
12
13
14
15
16
17
18
19
✅ 说明
getCurrentInstance()获取当前组件实例。instance.proxy.$parent访问父组件实例,并读取message。
# 6.3.2 使用 $parent 调用父组件方法
① 父组件
<template>
  <div class="father">
    <h3>父组件</h3>
    <Child />
  </div>
</template>

<script setup lang="ts">
import Child from "./Child.vue";

function showAlert() {
  alert("父组件方法被调用了!");
}
</script>
2
3
4
5
6
7
8
9
10
11
12
13
14
② 子组件
<template>
  <div class="child">
    <h3>子组件</h3>
    <button @click="callParentMethod">调用父组件方法</button>
  </div>
</template>

<script setup lang="ts">
import { getCurrentInstance } from "vue";

// 获取父组件实例
const instance = getCurrentInstance();
const parent = instance?.proxy?.$parent;

// 调用父组件方法
function callParentMethod() {
  parent?.showAlert();
}
</script>
2
3
4
5
6
7
8
9
10
11
12
13
14
15
16
17
18
19
✅ 说明
- 子组件通过
instance.proxy.$parent.showAlert()调用父组件方法。
# 6.4 $refs vs $parent
| 方法 | 适用场景 | 主要用途 | 推荐使用 |
|---|---|---|---|
$refs | 父 → 子 | 访问子组件实例或 DOM | ✅ |
$parent | 子 → 父 | 访问父组件实例 | ❌(不推荐) |
⚠️ $parent 的问题
- 破坏组件的 封装性 和 解耦性。
- 容易出错(如果组件层级发生变化,可能导致
$parent失效)。
🚀 最佳实践
- 父 → 子:推荐
props或$refs。 - 子 → 父:推荐
emit,不推荐$parent。
# 7. provide 和 inject(祖先 → 后代)
# 7.1 概述
在 Vue 组件间通信中,我们通常使用:
props(父 → 子)emit(子 → 父)$attrs(祖 → 孙)
但如果需要在 祖先组件和后代组件(不直接相邻)之间共享数据,逐层传递 props 可能会导致代码冗余。Vue 3 提供了 provide 和 inject,使 祖先组件可以直接提供数据,后代组件可以随时获取这些数据,避免中间组件的干扰。
# 7.2 provide 和 inject 适用场景
- 祖先组件向深层嵌套的后代组件共享数据,避免
props层层传递。 - 封装插件、状态管理(如
Pinia内部就用到了provide/inject)。 - 某些组件库的全局配置(如
Naive UI组件库的ConfigProvider)。
# 7.3 provide 和 inject 的基本用法
7.3.1 provide() - 祖先组件提供数据
语法
import { provide } from 'vue';
provide(key, value);
2
key:数据的 标识符,可以是 字符串 或 Symbol。value:要提供的数据,可以是 基础类型、对象、函数或响应式数据。
7.3.2 inject() - 后代组件获取数据
语法
import { inject } from 'vue';
inject(key, defaultValue);
2
key:要获取的provide中提供的 key,需要和provide对应。defaultValue(可选):如果provide中没有提供该key,则返回defaultValue。
# 7.4 provide 和 inject 实现祖孙组件通信
- 父组件 (
Father.vue):使用provide提供数据。 - 子组件 (
Child.vue):不需要声明props,仅作为 中间组件。 - 孙组件 (
GrandChild.vue):使用inject获取provide提供的数据。
# 7.4.1 祖先组件(父组件 Father.vue)
在 Father.vue 中
- 使用
provide提供数据。 - 数据包含普通数据、响应式数据、对象以及方法。
<template>
  <div class="father">
    <h3>父组件</h3>
    <h4>资产:{{ money }}</h4>
    <h4>汽车:{{ car.brand }} - {{ car.price }}万</h4>
    <button @click="money += 1">资产 +1</button>
    <button @click="car.price += 1">汽车价格 +1</button>
    <Child />
  </div>
</template>

<script setup lang="ts">
import { ref, reactive, provide } from 'vue';
import Child from './Child.vue';

// 响应式数据
const money = ref(100);
const car = reactive({
  brand: '奔驰',
  price: 100
});

// 方法:增加资产
function updateMoney(value: number) {
  money.value += value;
}

// 通过 `provide` 提供数据
provide('moneyContext', { money, updateMoney });
provide('car', car);
</script>
2
3
4
5
6
7
8
9
10
11
12
13
14
15
16
17
18
19
20
21
22
23
24
25
26
27
28
29
30
31
✅ 说明
provide('moneyContext', { money, updateMoney }):提供响应式money和updateMoney方法。provide('car', car):提供reactive对象car。
# 7.4.2 中间组件(子组件 Child.vue)
在 Child.vue 中
- 不需要声明
props,只是一个中转组件。 - 数据自动透传到孙组件。
<template>
  <div class="child">
    <h3>我是子组件</h3>
    <GrandChild />
  </div>
</template>

<script setup lang="ts">
import GrandChild from './GrandChild.vue';
</script>
2
3
4
5
6
7
8
9
10
✅ 说明
Child.vue没有props,数据直接从Father.vue传递到GrandChild.vue。
# 7.4.3 后代组件(孙组件 GrandChild.vue)
在 GrandChild.vue 中
- 使用
inject获取moneyContext和car。 - 数据是响应式的,修改后会影响
Father.vue。
<template>
  <div class="grand-child">
    <h3>我是孙组件</h3>
    <h4>资产:{{ money }}</h4>
    <h4>汽车:{{ car.brand }} - {{ car.price }}万</h4>
    <button @click="updateMoney(10)">点我增加资产</button>
  </div>
</template>

<script setup lang="ts">
import { inject } from 'vue';

// 获取 `moneyContext`,如果 `provide` 未提供,则使用默认值
const { money, updateMoney } = inject('moneyContext', {
  money: ref(0),
  updateMoney: (x: number) => {}
});

// 获取 `car`,如果 `provide` 未提供,则返回 `null`
const car = inject('car', null);
</script>
2
3
4
5
6
7
8
9
10
11
12
13
14
15
16
17
18
19
20
21
✅ 说明
inject('moneyContext')获取provide提供的数据。inject('car')获取car对象,数据是 响应式的,修改car.price会同步到Father.vue。
# 7.6 provide 和 inject 的数据类型和默认值
| 数据类型 | 是否响应式 | 说明 |
|---|---|---|
基本类型 (ref) | ✅ | 自动响应式,可以双向更新 |
对象 (reactive) | ✅ | 自动响应式,适用于结构化数据 |
| 普通对象 | ❌ | 不是响应式的,只能单向传递 |
| 函数 | ✅ | 可以传递方法,后代组件调用 |
provide和inject的默认值
如果 inject() 的 key 不存在,可以提供一个默认值:
const money = inject('money', ref(0)); // 如果 `provide` 没有提供 `money`,默认值为 0
# 8. 任意组件数据共享 (pinia)
参考之前pinia部分的讲解
# 9. 父传子(插槽 slot)
# 9.1 概述
在 Vue 组件通信中,通常使用:
props(父 → 子):适用于数据传递emit(子 → 父):适用于事件触发provide/inject(祖 → 孙):适用于全局共享数据
但如果 父组件需要向子组件传递模板内容(而不仅仅是数据),就可以使用 插槽 slot。插槽允许:
- 父组件传递自定义内容(如 HTML、组件)。
- 子组件在特定位置渲染父组件传递的内容。
# 9.2 插槽的基本用法
Vue 3 插槽的使用方式与 Vue 2 基本一致,但 Vue 3 增强了插槽功能:
- 支持组合式 API
- 支持动态插槽名
- TypeScript 友好
# 9.2.1 基本插槽
父组件(传递 slot 内容)
<template>
  <div class="father">
    <h3>父组件</h3>
    <Child>
      <p>👋 这是父组件传递的插槽内容</p>
    </Child>
  </div>
</template>

<script setup>
import Child from "./Child.vue";
</script>
2
3
4
5
6
7
8
9
10
11
12
子组件(接收 slot 内容)
<template>
  <div class="child">
    <h3>子组件</h3>
    <slot></slot> <!-- 这里渲染父组件传递的内容 -->
  </div>
</template>

<script setup>
</script>
2
3
4
5
6
7
8
9
✅ 说明
- 父组件 在
Child组件内写入<p>👋 这是父组件传递的插槽内容</p>作为插槽内容。 - 子组件 使用
<slot></slot>占位,父组件传递的内容会被渲染到<slot>位置。
# 9.2.2 具名插槽
默认插槽只能有一个,如果子组件需要 多个插槽,可以使用 具名插槽(Named Slots)。
父组件
<template>
  <Child>
    <template #header>
      <h1>📌 这里是父组件的标题</h1>
    </template>

    <template #content>
      <p>💡 这里是父组件的内容</p>
    </template>

    <template #footer>
      <p>📢 这里是父组件的页脚</p>
    </template>
  </Child>
</template>

<script setup>
import Child from "./Child.vue";
</script>
2
3
4
5
6
7
8
9
10
11
12
13
14
15
16
17
18
19
子组件
<template>
  <div class="child">
    <header><slot name="header">默认标题</slot></header>
    <main><slot name="content">默认内容</slot></main>
    <footer><slot name="footer">默认页脚</slot></footer>
  </div>
</template>

<script setup>
</script>
2
3
4
5
6
7
8
9
10
✅ 说明
- 父组件 通过
#header、#content、#footer传递多个插槽内容。 - 子组件 通过
<slot name="header">默认标题</slot>指定不同的插槽位置,并提供默认内容。
# 9.2.3 作用域插槽
如果子组件希望 向插槽内容传递数据,可以使用 作用域插槽(Scoped Slots)。
父组件
<template>
  <Child>
    <template #default="{ message }">
      <p>📢 子组件传递的数据:{{ message }}</p>
    </template>
  </Child>
</template>

<script setup>
import Child from "./Child.vue";
</script>
2
3
4
5
6
7
8
9
10
11
子组件
<template>
  <div class="child">
    <h3>子组件</h3>
    <slot :message="message"></slot>
  </div>
</template>

<script setup>
import { ref } from "vue";
const message = ref("Hello from Child");
</script>
2
3
4
5
6
7
8
9
10
11
✅ 说明
- 子组件 使用
<slot :message="message"></slot>传递message数据给父组件。 - 父组件 通过
#default="{ message }"接收 作用域数据,并显示在p标签内。
# 9.2.4 动态插槽
Vue 3 支持动态插槽名,允许根据 变量 动态选择插槽。
父组件
<template>
  <div>
    <Child>
      <template #[dynamicSlotName]>
        <p>🌟 这里是动态插槽内容</p>
      </template>
    </Child>
    <button @click="changeSlot">切换插槽</button>
  </div>
</template>

<script setup>
import { ref } from "vue";
import Child from "./Child.vue";

const dynamicSlotName = ref("header");

const changeSlot = () => {
  dynamicSlotName.value = dynamicSlotName.value === "header" ? "footer" : "header";
};
</script>
2
3
4
5
6
7
8
9
10
11
12
13
14
15
16
17
18
19
20
21
子组件
<template>
  <header><slot name="header">默认标题</slot></header>
  <footer><slot name="footer">默认页脚</slot></footer>
</template>

<script setup>
</script>
2
3
4
5
6
7
✅ 说明
#[dynamicSlotName]允许动态选择插槽(如header或footer)。- 点击按钮
changeSlot可以切换插槽内容。
# 9.6 Vue 3 插槽的 TypeScript 支持
Vue 3 提供了 更好的 TypeScript 支持,可以定义 插槽参数的类型。
父组件
<template>
  <Child>
    <template #default="{ text }">
      <p>📝 {{ text }}</p>
    </template>
  </Child>
</template>

<script setup lang="ts">
import Child from "./Child.vue";

// 定义插槽参数类型
interface SlotProps {
  text: string;
}
</script>
2
3
4
5
6
7
8
9
10
11
12
13
14
15
16
子组件
<template>
  <slot :text="message"></slot>
</template>

<script setup lang="ts">
import { ref } from "vue";

const message = ref("这是 TypeScript 作用域插槽内容");
</script>
2
3
4
5
6
7
8
9
✅ 说明
- 通过
interface SlotProps { text: string; }定义插槽数据类型。 - 子组件
slot :text="message"传递数据,父组件{ text }获取数据。
# 9.7 插槽 vs props
| 特性 | 插槽 slot | props |
|---|---|---|
| 传递内容 | HTML 结构 | 数据 |
| 适用场景 | 灵活布局(如 header、footer) | 纯数据传递(如 title, count) |
| 作用域数据 | 作用域插槽 slot="{ data }" | props 直接接收数据 |
| 父组件控制 | 父组件决定显示内容 | 子组件控制 props 如何渲染 |
总结
| 插槽类型 | 适用场景 | 语法 |
|---|---|---|
| 默认插槽 | 父组件传递基本内容 | <slot></slot> |
| 具名插槽 | 父组件传递多个内容 | <slot name="header"></slot> |
| 作用域插槽 | 子组件向父组件传递数据 | <slot :data="info"></slot> |
| 动态插槽 | 动态改变插槽名 | #[dynamicSlotName] |